
Most garages become dumping grounds, bikes leaning against half-empty paint cans, seasonal decorations piled on rusty shelves, and barely enough room to squeeze past the car. But a well-designed garage interior isn’t just about aesthetics. It’s about reclaiming square footage, improving workflow, and turning a neglected space into something genuinely useful. Whether you’re building a workshop, a home gym, or just need a place where you can actually find your socket set, thoughtful interior design makes the difference between chaos and capability. This guide walks through the planning, materials, and finishing details to help transform any garage into a functional space worth opening the door to.
Table of Contents
ToggleKey Takeaways
- Garage interior design increases home value, daily efficiency, and safety by transforming cluttered spaces into organized, functional zones for vehicles, tools, and projects.
- Proper planning—including vehicle clearance, designated work zones, and traffic flow mapping—is essential before selecting storage systems or finishes for garage interior design.
- Epoxy flooring coatings offer the best durability for garages, resisting chemicals and stains, though polyurea coatings cure faster and interlocking tiles provide a DIY-friendly alternative.
- Layered lighting (ambient LED shop lights, task lighting, and motion sensors) dramatically improves visibility and safety, with overhead fixtures rated at 50–75 lumens per square foot in work areas.
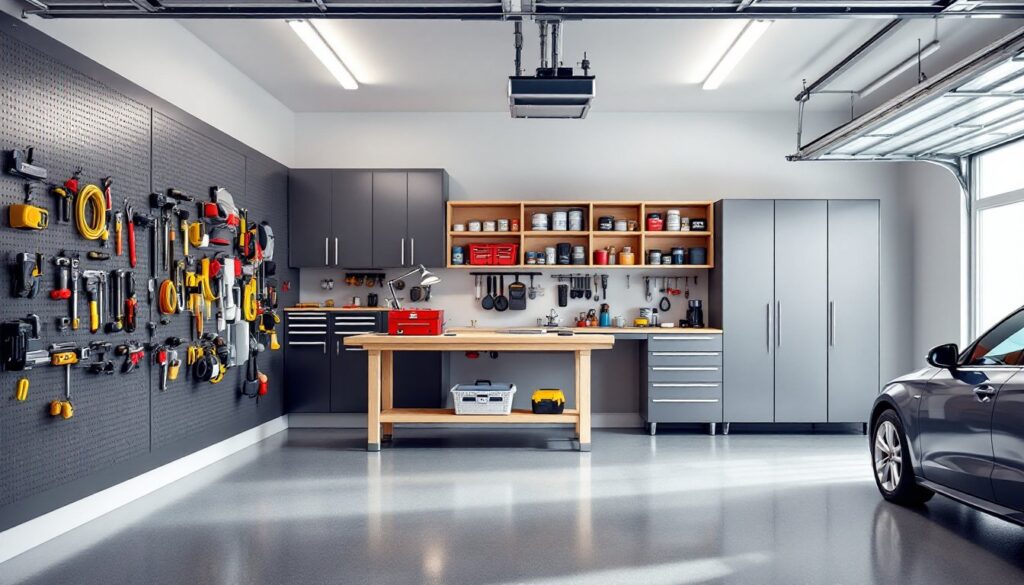
- Wall-mounted systems like slatwall and French cleats, combined with ceiling-mounted racks and cabinetry, maximize storage without sacrificing floor space for vehicles and movement.
- Starting with layout and electrical planning, then tackling flooring, storage, lighting, and finishes in phases ensures a cost-effective transformation that pays dividends in organization and property value.
Why Garage Interior Design Matters More Than You Think
A garage interior isn’t just utilitarian, it affects home value, daily efficiency, and even safety. Real estate appraisers note that a finished, organized garage can add perceived value during resale, especially in markets where storage is at a premium. More immediately, a well-designed space reduces time wasted hunting for tools, minimizes tripping hazards, and creates dedicated zones for different tasks.
Many homeowners overlook the garage when renovating, but it’s one of the highest-impact spaces per square foot. Unlike a guest bedroom used twice a year, the garage serves daily functions: vehicle maintenance, tool storage, seasonal gear rotation, and overflow workspace. Poor design leads to inefficiency and clutter creep.
Think of garage design as zoning for micro-tasks. You wouldn’t store a drill next to ski boots, just like you wouldn’t park a table saw in front of the door. Intentional layout and finishes set up success from day one.
Planning Your Garage Layout for Maximum Functionality
Start with an honest inventory of how the space will actually be used. Will it house vehicles, serve as a workshop, store bulk household items, or all three? Sketch a scaled floor plan on graph paper or use a free tool like SketchUp to visualize clearances and workflow.
Key considerations:
- Vehicle clearance: Allow at least 24 inches on each side of a parked car for door swing and walking space. For a standard two-car garage (approximately 20×20 feet), that leaves a perimeter of roughly 4–5 feet for storage and work zones.
- Work zones: Designate distinct areas, tool wall, workbench, bulk storage, seasonal items. Avoid mixing functions in the same footprint: it leads to constant reshuffling.
- Electrical and HVAC: Check for existing outlets and assess whether you’ll need additional circuits for power tools, a mini-fridge, or a heater. Consult a licensed electrician if you plan to add 240V circuits for welders or EV chargers, this typically requires a permit per the National Electrical Code (NEC).
- Door swing and traffic flow: Garage doors, entry doors, and cabinet doors should open without blocking pathways. Map these arcs on your plan before committing to shelving or benches.
If the garage doubles as a workshop, consider a modular workbench on casters. This allows reconfiguration when you need floor space for larger projects or vehicle work. For inspiration on maximizing tight layouts, budget-friendly storage ideas often include clever use of vertical space and repurposed materials.
Flooring Options That Combine Durability and Style
Garage floors take a beating, oil drips, dropped tools, hot tires, freeze-thaw cycles. The right flooring protects the concrete slab and makes cleanup easier.
Epoxy coating: A two-part epoxy system is the gold standard for durability. It resists chemicals, provides a semi-gloss finish, and hides minor stains. Surface prep is critical: etch or grind the concrete to open the pores, then thoroughly clean and dry before application. Expect coverage of about 250–300 square feet per gallon for a standard two-coat system. Cure time is typically 72 hours before vehicle traffic. Some epoxy kits include decorative color flakes for slip resistance and visual interest.
Interlocking tiles: Rigid PVC or polypropylene tiles snap together without adhesive, making them a DIY-friendly option. They’re available in various textures (coin, diamond tread) and colors. Tiles elevate the floor slightly, which can help with moisture management but may create a small lip at the door threshold. They’re easier to replace in sections if damaged.
Polyurea or polyaspartic coatings: These are similar to epoxy but cure faster (often within 24 hours) and are more UV-stable, so they won’t yellow under sunlight from windows or open doors. They cost more but can be worth it if you’re in a hurry or have sun exposure.
Concrete stain or sealer: For a low-profile, budget-conscious option, acid-based or water-based concrete stains add color, and a penetrating sealer provides modest protection. This won’t hold up to heavy abuse like epoxy but works if the garage is primarily for storage.
Safety note: Wear a respirator with organic vapor cartridges, gloves, and eye protection when applying chemical coatings. Ventilate the space with fans and open doors.
Smart Storage Solutions to Declutter Your Garage
Storage is where garage design lives or dies. The goal is to keep items accessible without sacrificing floor space.
Wall-mounted systems:
- Slatwall panels: Grooved MDF or PVC panels mount to studs and accept hooks, baskets, and shelves. They’re reconfigurable and visually cleaner than pegboard. Install with 3-inch screws into wall studs spaced 16 or 24 inches on center.
- French cleat systems: A beveled cleat (cut from ¾-inch plywood at a 45-degree angle) mounts horizontally to the wall: matching cleats attach to tool cabinets or bins. This allows heavy items, like miter saws or toolboxes, to hang securely and swap positions easily.
- Pegboard: The classic option. Use ¼-inch tempered hardboard pegboard with spacers behind it to allow hook insertion. It’s affordable but less robust than slatwall for heavy tools.
Overhead storage:
Ceiling-mounted racks (typically 4×8 feet) hang from garage ceiling joists and hold bins, seasonal gear, or lumber. Verify joist spacing and load capacity, most systems rate for 600 pounds when properly installed into solid framing. If your garage has a truss roof system, consult load tables or a structural engineer before hanging heavy storage.
Cabinet and shelving:
Pre-fab steel or resin cabinets resist moisture and pests. For a custom look, build plywood cabinets with melamine-coated interiors for easy cleaning. Open shelving works for frequently accessed items: enclose cabinets for anything you want dust-free or hidden. Standard shelf depth is 16–24 inches: go narrower along walkways to preserve clearance.
Tool organization specifics:
- Magnetic strips for wrenches and blades
- PVC pipe cut into short sections and mounted horizontally to hold cordless drill batteries, spray cans, or dowels
- Drawer dividers or foam tool inserts for small parts and fasteners
For additional design inspiration on integrating storage with aesthetic finishes, many modern garages blend open and closed systems for visual balance.
Lighting Design That Makes Your Garage Work Harder
Dim lighting turns simple tasks into frustration. Garages need layered illumination: ambient, task, and accent.
Ambient lighting:
LED shop lights are the workhorse. Linkable 4-foot fixtures with 4,000–5,000 lumens each provide even overhead coverage. Mount them in rows parallel to the long axis of the garage for uniform light. Aim for roughly 50–75 lumens per square foot in work areas. Cooler color temperatures (4000K–5000K daylight) improve visibility for detail work without the harsh blue cast of 6000K.
If upgrading from incandescent or fluorescent, rewire fixtures for direct 120V LED boards rather than retrofitting bulbs. It’s cleaner and more reliable.
Task lighting:
Under-cabinet LED strips or articulating arm lamps at the workbench eliminate shadows when measuring, cutting, or assembling. Battery-powered magnetic work lights are handy for inspecting under vehicles or inside cabinets.
Motion sensors and smart controls:
Install motion-activated switches near entry doors so lights turn on automatically when you walk in with arms full. Some LED systems integrate with smart home platforms, allowing dimming or scheduling. This is overkill for a basic garage but useful if it doubles as a home gym or hobby studio.
Safety and code notes:
All garage lighting circuits should be GFCI-protected if within 6 feet of a sink or water source, per NEC standards. If you’re adding new circuits, pull permits and have work inspected, improper electrical is a leading cause of garage fires.
Windows and natural light:
If your garage has windows, clean them and consider adding a window treatment that diffuses light without blocking it entirely. Frosted film or roller shades work well. Natural light reduces midday energy use and makes the space more inviting. For more design tips and trends, many recent projects integrate both functional and decorative lighting to elevate garage interiors.
Wall Treatments and Finishing Touches for a Polished Look
Bare drywall or exposed studs look unfinished and collect dust. Wall treatments protect surfaces and set the visual tone.
Drywall finishing:
If the garage is drywalled but not taped and painted, finish it. Use moisture-resistant drywall (green board or purple board) in humid climates. Tape seams, apply joint compound, sand smooth, then prime with a PVA drywall primer. Top with a satin or semi-gloss latex paint for easier cleaning. Light colors (white, light gray, beige) reflect light and make the space feel larger.
Painted concrete block or CMU:
If walls are concrete masonry units, clean them with a wire brush and TSP solution, then apply a masonry primer followed by elastomeric or epoxy-based paint. This seals pores and resists moisture.
Paneling and wainscoting:
FRP (fiberglass-reinforced panels) are common in commercial settings and work well in garages, they’re impact-resistant, washable, and available in various colors. Install with panel adhesive and aluminum trim. For a more residential look, tongue-and-groove pine or plywood paneling adds warmth. Seal with polyurethane if you expect grease or chemical exposure.
Accent walls and branding:
If the garage is also a hobby space, consider an accent color or even a mural. Car enthusiasts sometimes paint racing stripes or team colors. Just keep it tasteful, resale value matters.
Insulation:
If the garage isn’t insulated, adding batt insulation (R-13 to R-19) between studs and covering with drywall dramatically improves comfort and energy efficiency, especially if there’s living space above or the garage shares a wall with the home. This may require a permit depending on jurisdiction and scope.
Trim and baseboards:
Add PVC or composite baseboards to protect the wall-floor junction from mop water and bumps. They’re rot-proof and easy to clean. Caulk seams for a finished look.
Final details:
- Install corner guards (plastic or metal) on high-traffic corners to prevent dings.
- Use a threshold ramp or seal at the garage door to keep out leaves, dirt, and pests.
- Consider a garage door insulation kit (foil-faced foam panels) if the space will be climate-controlled.
Conclusion
Transforming a garage interior doesn’t require a full gut renovation, just intentional planning and the right materials. Focus on durable flooring, smart storage that scales with your needs, and lighting that supports the tasks you’ll actually do. Wall treatments and finishing touches elevate the space from utilitarian to purposeful. Tackle projects in phases if budget or time is tight, but always start with layout and electrical planning. A well-designed garage pays dividends in efficiency, safety, and home value for years to come.