
Planning a kitchen remodel or finishing a basement? Before you knock down walls or order custom cabinets, you’ll want to see what you’re building. That’s where interior design renderings come in. These aren’t just pretty pictures, they’re working blueprints for your renovation, showing you exactly how materials, lighting, and layout choices will look in your actual space. They catch design mistakes before you make expensive ones, help you communicate with contractors, and give you confidence before the first swing of the hammer.
Table of Contents
ToggleKey Takeaways
- Interior design renderings provide photorealistic digital previews that help you visualize materials, lighting, and layout before committing to expensive renovation decisions.
- Renderings catch design mistakes early, improve communication with contractors, and demonstrate compliance with building codes for permit applications.
- You can obtain renderings through professional designers ($150–$500+ per view), design-build contractors, or DIY software like SketchUp, RoomSketcher, and Planner 5D.
- Combine 2D floor plans for accurate layout and measurements with 3D renderings to evaluate aesthetics, ensuring both the functional design and visual appeal work in your space.
- Verify scale, test different lighting scenarios, examine material transitions, and print renderings at larger sizes to identify potential issues before construction begins.
- Remember that renderings are close approximations, not pixel-perfect predictions—natural material variation means minor adjustments during installation are normal.
What Are Interior Design Renderings?
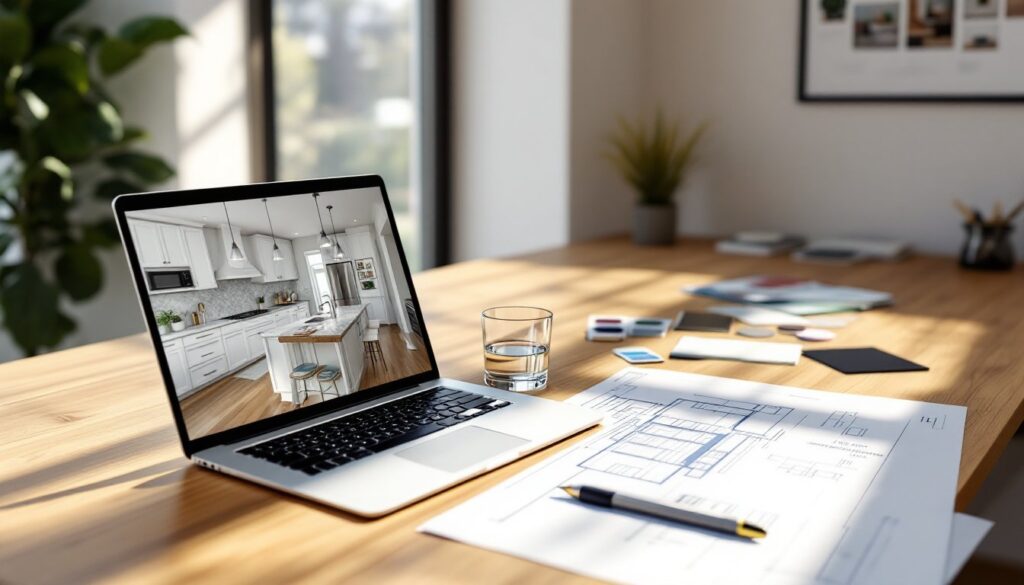
An interior design rendering is a digital visualization of a space that doesn’t exist yet, or one that’s about to change. Think of it as a photorealistic preview generated by computer software, showing walls, floors, furniture, fixtures, lighting, and finishes as they’ll actually appear.
These aren’t sketches or rough concepts. Modern renderings use 3D modeling software to create accurate, scale representations of your room. The software calculates light angles, shadow fall, texture details, and material reflections to produce images that look nearly identical to finished photographs.
Renderings can show a single view or multiple camera angles. They range from simple layout mockups with basic colors to fully detailed scenes where you can see wood grain on cabinetry, grout lines in tile, and how afternoon sun will hit your new reading nook.
For DIYers and homeowners, renderings bridge the gap between imagination and reality. You can visualize whether that accent wall works, if your furniture will fit, or whether open shelving beats upper cabinets, all before buying materials or hiring labor.
Why Renderings Matter for Your Home Renovation Project
Renderings save money and prevent regret. Most renovation mistakes happen because homeowners can’t accurately picture the finished product. That paint color looked great on a 2×2″ sample card but overwhelming on four walls. The island seemed like a good idea until it blocked the fridge door.
A rendering lets you test choices without financial commitment. Swap tile patterns, move a doorway, change countertop materials, or try five different backsplashes in ten minutes. Compare options side by side. Show your spouse exactly what “sage green” means to you versus what it means to them.
They also improve contractor communication. Instead of describing your vision and hoping the electrician interprets “ambient lighting” the same way you do, you hand over an image. Contractors can spot potential issues early, like whether that beam location conflicts with HVAC routing or if your custom vanity leaves enough clearance for plumbing access panels.
For projects that need permits, renderings demonstrate design intent to building officials. They won’t replace engineered drawings for structural work, but they help illustrate compliance with code requirements like egress window sizes, stair dimensions, or accessible bathroom layouts.
Many platforms for home design inspiration now let homeowners build project boards and connect with professionals using visual references, making the translation from idea to execution smoother.
Types of Interior Design Renderings to Know
Not all renderings serve the same purpose. Understanding the differences helps you choose what you actually need.
Photorealistic renderings are the gold standard. These high-resolution images include realistic lighting, shadows, textures, and accurate color representation. They’re what professional designers deliver to high-end clients and what you’ll see in luxury interior design portfolios. They require powerful software and skill but provide the most accurate preview. Expect these to take hours per view.
Conceptual or stylized renderings sacrifice some realism for speed. Colors might be simplified, textures less detailed, lighting more even. They work well for layout decisions and material comparisons when you don’t need to see every grout line. Most DIY software produces renderings in this category.
Walkthrough or flythrough animations move through the space as a video. These help visualize flow between rooms and how spaces connect. They’re overkill for a single bathroom remodel but valuable for whole-home renovations or additions where circulation matters.
Virtual reality (VR) renderings let you “stand” in the space using a VR headset. You can look up at ceiling details, turn 360 degrees, and get a sense of scale that flat images can’t provide. The technology is becoming more accessible but still requires compatible software and hardware.
3D Renderings vs. 2D Floor Plans
A 2D floor plan shows the room from directly above, like a map. It’s perfect for understanding layout, measuring distances, planning furniture placement, and checking code compliance. You’ll see where walls, doors, windows, and fixtures go, with accurate dimensions marked.
3D renderings show the room from a person’s perspective. You see height, depth, and how elements relate spatially. A 2D plan might show a shower is 36″ × 48″, but a 3D rendering shows whether it feels cramped or spacious with that tile pattern on the walls.
Most projects benefit from both. Use 2D plans for layout and measurements, 3D renderings for finishes and aesthetics. If you’re moving walls or changing room function, start with 2D to get the bones right. Once the layout works, create 3D views to nail down materials and colors.
How to Get Interior Design Renderings for Your Home
You have three main paths: hire a professional, use DIY software, or work with a design-build contractor who includes renderings in their service.
Professional interior designers and rendering specialists produce the highest quality work. They’ll measure your space, discuss your vision, and deliver photorealistic images or full walkthroughs. Costs range widely, expect anywhere from $150 to $500+ per rendering view depending on complexity, detail level, and your market. Multi-view packages or whole-home projects may run several thousand dollars. This route makes sense for major remodels, custom new builds, or when you’re making expensive material decisions and want absolute confidence.
Design-build contractors and some remodeling companies include renderings as part of project proposals. The quality varies, some use professional rendering software, others rely on basic 3D tools. Ask to see samples before signing a contract. This option works well when you’ve already chosen your contractor and want visualization included in the overall project scope.
DIY Rendering Software and Tools
If you’re comfortable with computers and want control over the process, DIY software can produce solid results. The learning curve varies, but most homeowners can create usable renderings with a few hours of practice.
SketchUp (formerly Google SketchUp) is industry-standard 3D modeling software with a free web version and a paid Pro version ($135/year). It’s powerful but has a steeper learning curve. You can model exact room dimensions, import manufacturer models of actual products, and export renderings. The SketchUp 3D Warehouse community shares thousands of furniture and fixture models you can drop into your design.
RoomSketcher focuses specifically on home design. It offers 2D and 3D floor plans, 360-degree views, and photorealistic rendering. Plans start around $49/month. The interface is more intuitive than SketchUp for beginners.
Planner 5D and HomeByMe are free browser-based tools with drag-and-drop interfaces. They produce decent conceptual renderings and work well for furniture layout and basic color decisions. Rendering quality won’t match professional work, but they’re excellent for DIY planning.
Chief Architect is professional-grade software ($2,995+) used by builders and designers. It’s overkill for most homeowner projects unless you’re doing multiple renovations or building from scratch, but it produces construction-ready drawings alongside photorealistic renderings.
Whatever tool you choose, you’ll need accurate room measurements. Use a laser measure (not a tape measure alone) and note ceiling height, window and door locations and dimensions, existing fixture positions, and any structural elements like posts or beams. Measure twice. A rendering based on wrong dimensions is worse than no rendering at all.
Safety note: When measuring spaces, watch for asbestos-containing materials in older homes (pre-1980s), especially around pipes, flooring, and ceiling tiles. Don’t disturb questionable materials, hire a certified inspector if you’re uncertain.
Making the Most of Your Design Renderings
A rendering is only useful if you know how to interpret it and what to look for.
First, verify scale and proportions. Does that sofa actually fit with 36″ of walkway clearance around it, or does the rendering make the room look bigger than it is? Check that ceiling heights match reality, standard residential ceilings are 8′ or 9′, not the 10′ heights that make renderings look dramatic. Confirm door swings don’t block each other or hit fixtures.
Test lighting scenarios if your software allows it. A rendering showing noon sun through south-facing windows won’t tell you what the space looks like at 7 AM or under artificial light at night. Some tools let you adjust time of day and light sources, use them.
Examine material transitions and joints. Where does tile meet hardwood? How does the backsplash terminate at the edge of the counter? These details often get glossed over in renderings but cause problems during installation. A good rendering should show edge trim, transitions, and how different materials meet.
Print the renderings at a decent size (8×10″ minimum) and live with them for a few days. What looks great on a screen might feel different when you study it over morning coffee. Show them to your contractor before ordering materials. An experienced pro can spot impractical details, like a tile pattern that requires excessive cuts, a light fixture that’ll be hard to access for bulb changes, or a layout that complicates rough-in plumbing.
Use renderings as a communication baseline with everyone involved. When you tell the tile installer “herringbone pattern,” you both reference the same image. When the electrician places can lights, they match the rendering’s layout. This prevents the expensive “that’s not what I meant” conversations mid-project.
Finally, remember that renderings are close, not exact. Real materials have variation, wood grain differs between boards, natural stone varies in color, paint looks different under various lighting. Budget for minor adjustments and don’t expect the finished space to match the rendering down to the pixel. But if you’ve done the work upfront, you’ll be close enough to feel confident and avoid major surprises.